✨ Quick Start
Publish your first API in 5 mins
Building an API let's you create reusable logic that you can use from anywhere.
With Craftar you can define your logic by connecting lego-like blocks.
Here's how: 👇
Step 1: Sign up/Login to Craftar
If you haven't yet, you can Sign up for free.
If you already have an account, you can Log In here.
Step 2: What are we building?
We will be creating an API that can tell jokes!
The api will have the following Input and Output:
Input
Category
One of Any, Miscellaneous, Programming, Dark, Pun, Spooky, Christmas
Output
Joke
Why did the koala get rejected? Because he did not have any koalafication.
Step 3: Create API
- Go to dashboard click on the Create API card.
- Then write a name for the API, in this case Jokes API
- Click Create
Step 4: Create Jokes Block
- Right click on the canvas (white area) to open up the blocks menu
- Choose Fun category
- Choose Jokes
You should now see a Jokes block created as shown below.
Step 5: Create API Input
The left sidebar is where we define the inputs and outputs of our API
- Click on the icon to create an Input
- This opens up a right sidebar for that input
- Change the name of Input0 to Category
- Choose the data type as Text
- Set the value to Pun (we'll use this to test our API)
Step 5: Create API Output
- Click on icon next to Outputs
- This opens up a right sidebar for that output
- Change the name of Output0 to Joke
- Choose the data type as Text
Step 6: Inputs and Outputs Block
All apis have an Inputs block and an Outputs block.
- When you create an Input from API Settings Sidebar (Step 5), it will create a port in the Inputs block.
- When you create an Output from API Settings Sidebar (Step 6), it create a port in the Outputs block.
All APIs start running from Inputs block and stop running at Outputs block.
Step 7: Connect Blocks: Flow
We will define the order in which blocks will run by connecting Exit to Enter.
- Flow is defined by connecting green triangle ports.
- Each block has it's own enter and exit ports.
- Inputs only has Exit since logic starts here
- Outputs only has Enter since logic ends here
To Connect left click on a triangle and then left click on the other triangle you want to connect to.
- Connect Exit of Inputs to Enter of Jokes Block
- Connect Exit of Jokes Block to Enter of Outputs Block
Logic starts at Inputs block -> Goes through Jokes Block -> Ends at Outputs Block
Step 8: Connect Blocks: Data
Our goal is to convert some Inputs to some Outputs.
Circles on each block represent data.
- Circles on Left Side of the block indicates input data
- Circle on Right Side of the block indicates output data
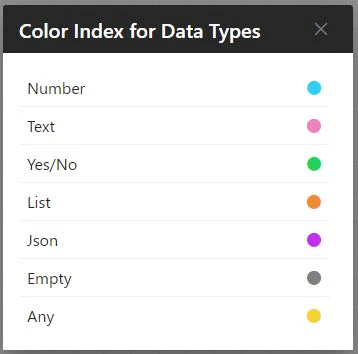
- Each circle has a color which indicate the type of data from following

- Outputs of a block can be connected to Inputs of a block ahead of it.
To Connect left click on a circle and then left click on the other circle of the same color you want to connect to.
- Connect Category circle of Inputs Block to Category circle of Jokes Block
- Connect Full Joke circle of Jokes Block to Joke circle of Outputs Block
Step 9: Play
Click on the Play button in the Top Bar
Play let's you test your APIs and check if your connections were correct.
Step 10: Check Results
Click on Inputs Block
- This opens block settings panel on the right
- You should see the value of Category output to be Pun
- Which is what we entered to test.
Click on Jokes Block
- Inputs Section shows you the inputs that were passed to it when you clicked Play.
- Outputs Section shows you the outputs from running this block
- You should see our Pun Joke generated.
Now click on Outputs Block
- The value of Joke input in the Outputs block should be equal to our Joke.
Step 11: Publish API
- Click on the Publish button in the Top Bar
- This will open up Publish Settings Panel.
- Click on the green Publish Now Button to Go Live
- Your API is live now and API key is generated
- Request params sections shows you the data you need to call the API from anywhere.
For a quick test: Click on Run Api In Browser button
Step 12: Congrats!
🎉 You have successfully created your first API that can tell jokes!
Next Steps
Learn more about 🧠 Fundamental Concepts
Discover 🚀 Use Cases
